11.20.2011

Phone Decoration!

I recently bought a new smart phone. I went for the Sony Ericsson xperia Arc (gold) o_0. Anyways, it is very fancy and I love Ericssons phones. My last phone where a Xperia mini (which wasn't actually that good). Aaaaaanyways!

This is me and my phone before the makeover
I wanted to decorate my phone in a decoden inspired way. This is some of the inspiration I found.

pic from ping mag. one of my favorites! <3
Go to link, to see more decoden phones. They have a lot of different styles :)


business card holder by angel-kitty


pic from this very girly glitter  blog


At first I was going for a theme like: My little pony, Hello kitty, or something like that since I have a bunch of decorating stuff like that from old jewelry and such. I also have a lot of nail decorating stones, pearls and gems (only plastic ones though ^^), which I wanted to fill in the spaces between the bigger stuff. I collected these things, and thought they went pretty well together color wise.


I tryed out different positions of the items, and then glued them on when I had decided. From there, it's just being creative with the filler gems!


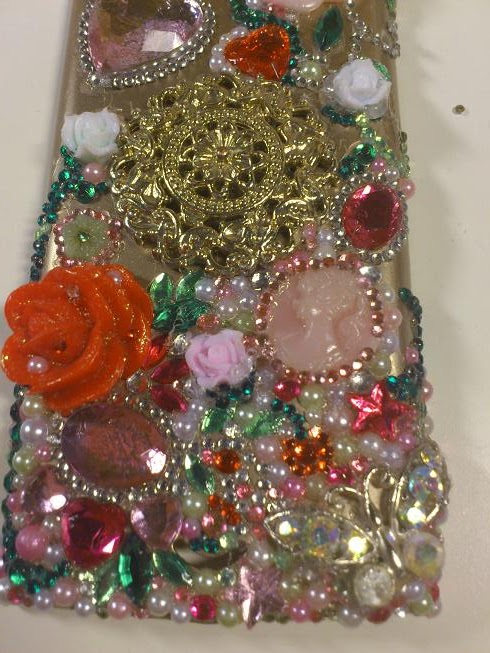
I started out by adding the biggest decoration pieces, to get an overall look of the outlay.
-pink rose and cameo is from a Lisbeth Dahl bracelet
-red rose broke of a ring.
-big hearts and gems: some are stickers and some are flat back rhinestone leftovers.
-big gold ornament from a ring I bought at H&M.
-small gell roses from nail decoration kit bought on e-bay.
-all smaller rhinestones and flat back pearls allso from nail decoration purchase from e-bay.
-butterfly is from a belly button piercing.

I mostly used regular universal glue.
I used Dana lim, which is definitely not the best glue for this, but it's cheap and easy to acquire (in Denmark).
For the odd shaped pieces I filled in the bigger spaces between the piece and the phone cover, with my glue gun,
and then glued the contacting surfaces with the universal glue.

And then I just kept on filling up the spaces with different sized rhinestones and flat back pearls.
I also added some gems to the roses for extra bling!


This is the final result!
I love every bit of it, and it makes me very happy to look at it every day ^^ 

It took me about 4 straight hours to put this together, and it hurt my neck a lot. But I'm so happy with my awesome phone now.! The best thing is that it doesn't have the same over the top childish cuteness as the ones I found for inspiration.

Buying stuff for decoration:
I allways use ebay to buy decoration stuff like this, because it is ridiculously chap! So here are some sellers I've used and am very happy with. My experience is that the shipping takes about 2 weeks from China.

peikuan123 Has a lot of deco stuff for nail, and scrap booking, like rhinestones and cute resin shapes like cakes.

timtimng Loads of cheap rhinestones.


11.10.2011

Shiva cosplay, step by step

This is gonna be a long one ^^'


I'm describing the process of making my Shiva cosplay, trying to describe what and how I made the different components.


    seams of the body suit


    Bodysuit: I had never made a body suit before, so I just did what came easiest to me: making a shirt and a pair of leggings - then sow them together :D - I made the leggings so they only have a seam on the inside of the legs (as shown on drawing 1). I fitted it while wearing it inside out. I left the shoulder seam open because my zipper skilz weren't that good that I trusted myself with sowing a zipper intro lycra that was supposed to be stretched when worn. I basically chose that I would rather sow myself into the suit X)

    "sky blue" body makeup
    I used this for my face and hands
    "royal blue" body makeup
    I used this for my feet :)
    The bodysuit got painted at the bottom of  the legs with the body paint I was using for my feet, this has a really nice effect and the transition from skin to suit became almost invisible unless you knew it was there. The patterns on the side of the thighs is painted with purple and silver acryllic paint while wearing the suit.

    The beaded chest pieces are made separately. I used a scrap of blue linen fabric I had lying around, placed it at my boob, pinned it so i got "the right shape", and then i sewed the incisions, then I placed it on my chest again and drew the shape i wanted. After cutting away what I didn't need, I was left with the base for the chest piece which I completely covered in beads and sequence. I made the icy side in a star shape. The sequence and pearls for this side where in a silver/grey/white/light blue theme. The other side I made more regular and cup shaped mostly in darker blue colors and then I made the snowflake pattern in white sequence with no glitter to make it stand out properly. When the beading was done, I jumped in the suit and placed them where they where supposed to be, and then hand stitched them on. (close up coming soon)

    (not me!)
    the point is to show the really
    cheap quality of the wig 
    The wig is made from 3 wigs of this type (pic.).One to use as a wig, and the others I wanted to use as separate hairpieces after cutting them up. Because of lack of time I didn't trust e-bay to be quick enough with the shipping of a wig, so I had to do my best with what I had. I unpacked them and colored them by hand In a big pot on the stove ^^. I used Dylon hand color for textiles. I made sure that it was able to color nylon and other artificial materials, so I was going to get the right color. I predicted that the color wouldn't become to dark because of the light base, so I chose a darker blue than I was aiming for, and it turned out perfect. After dying the wigs, I hung them to dry. While they dried up I sew bases for the dreadlocks. I sowed these dreadlocks in different lengths and of different thicknesses. I made them from blue cheap velvet (direct translate from danish: nervous velvet?), and filled them with batting. I made about 12. 

    batted dreadlock with ring

    The rings in the end of the tentacles are made from aluminum foil which I shaped into rings of different size, and then covered it in paper clay. The foil core makes it really light weight. I painted the rings with silver acrylic paint. I left one end of the dread lock open so I could sow them on the wig,  the other end, I folded around a ring and sewed it (see pic.). I left 2 tentacles with out rings. I picked one wig to be the one I was wearing


    wig being cut :P

    I started cutting 2 of the wigs into smaller hairpieces. I cut'd the amount of hair I wanted, sewed several times back and forth and then glued it together with my glue gun (see pic.).

    Now I'm left with  a lot of extensions, 1 wig (still with hair) an 12 dread locks.

     I wore the wig while attaching the open ends of the dreadlocks to the wig base with needles while making sure the hair on the wig didn't got stuck underneath. I wanted the right shape of the hair, and I haven't seen a shiva cosplay where it looked properly done and shaped. After all the dreads where attached with needles I sew what was possible on the machine, and hand sew the rest of it. 

    (my mad paint skillz)
    It is a wig with one dread sown on and
    wrapped in hair.
    Now the dreadlocks needed to be wrapped with hair and the brown linen (which was also a leftover from an  old Pocahontas costume :P ). I did it like I've tried to illustrate with my mad paint skillz since I didn't take any photos during the producing of this -_-' . I wrapped the hair still attached to the wig around the dreadlocks so almost none of the fabric underneath was showing, when I ran out of hair i used one of the extensions I made. Tucked it underneath the hair that was already wrapped and sealed it with some brown linen which I just wrapped around and tied in a knot. I did the same above the rings to make sure the hair stayed in place. 

    To keep this 11 kg (24 lbs) wig on my head I sewed on a silver sequenced elastic hair band just above the bangs of the wig. And the wig is done!

    The silver panties, are made from polyester, and blue elastic bands. They are placed so they cover up the connecting seam between the pans and the shirt of the body suit.

    The flowing hip shale is made from yellow chiffon which I dip dyed to make the bottom blue. The rings in the bottom of it is made from paper clay that I panted gold with acrylic paint. the Wrist gloves I made from a red/purple, 2 colored satin. It's basically a triangle with a hole for the finger, attached to a cuff. I closed it with velcro. I sowed on some gold rope with gems I made from fimo as well. 

    Go to my cosplay site for more photos of the finished cosplay.

    Old fashioned

    I found this blog today through the craftgossip blog. And I felt really inspired by her patchwork and embroidery skills! I've never thought of patchwork as something I ever would be interested in, but the way this (pic.) looks, just makes me wanna try it out.
    pic from this page

     I've been thinking of trying out embroidery for a long time now, and this tutorial on how to embroider (birds) on felt, is going to be very useful for me to get started. I'm thinking that I would use this when I want to applique a crest to a uniform f.x. Then I would be able to make it by hand - as I don't have a fancy sowing machine that does these things. I think I wil be able to do some pretty cool stuff with this inspiration an these techniques :D

    But first I need to get myself an embroidery hoop -->
    -bought this (only one hoop) on e-bay for 5.98 $ ^^

    on my TO DO list is now!: trying out embroidery

    11.01.2011

    Final Morrigan Wig

    So I finally decided on a wig for Morrigan, adn I ended up with this one:

    It has a color that is just right and it was cheap to! only 16.59 $. Now I'm happy! and my next step on this cosplay project is to start sewing the bodystockings. My plan is to make a corsage for each of us, to get the right support for the wings. In general I like the corsage base for most cosplays which are tight fitting, It gives a smoother surface with less folds, and that is awesome for maintaining the animated character look.

     I want to get hold of some red and black pleather for both cosplays. AND I need feathers for the "straps" - I think I'm gonna check e-bay for this as well. The fabric I can get in a danish fabricshop :)

    10.28.2011

    Morrigan & Lilith, Darkstalkers


    My friend Ariellah asked med if I was interested in cosplaying Morrigan with her as Lilith from Darkstalkers for an upcoming con. My answer was SURE! I've always loved the character designs from the old school fighting games as Streetfighter and Darkstalkers, so this is a challenge I'm really looking forward to getting my hands on.


    My cosplay productions always start at the same place... E-BAY! The only place to go to get good quality wigs for a decent price. In Denmark we've only got a few costume/wig shops and they´re expensive. One could easily spend 100$ on a wig, and on a students budget, it would mean I have to live of pasta for the rest of the month.

    As I took up the task of creating both cosplays, I also agreed to just buy what we needed and Ariellah will pay me afterwards.

    I found a wig for each of us and a pair of pantyhose for each of us as well.

    • Lilith wig: 12$ incl. shipping
    • Morrigan wig: 9.46 £ incl. shipping
    • Lilith pantyhose 2.49 $ incl. shipping: 
    • Morrigan pantyhose 2.58 $ incl. shipping:
    I received the Lilith wig first, and it is perfect! the color and quality was as good as it gets, and I'm very happy. But then i got the Morrigan wig.... omfg! The picture did not at all live up to the picture on e-bay. It was very plastic like and VERY green (it kinda resembles the one on the right).. on the pic it clearly looks a shade of aqua/bluish-green, but it was not...

    This has never happened to me before, but I have to return it! I hate half ass cosplays and I'm not gonna compromise my dignity by wearing crap like that. So I guess that's the next big "TO DO" on this cosplay; order a new wig for Morrigan.


    The above, are the pantyhose I ordered for both of us. the blue for Lilit and the purple for Morrigan. I received them yesterday.... and they are WAY to dark  -_- damn! But these I'm keeping to use myself for everyday wear. Anyways, I've just ordered two new pairs of pantyhose with a more sheer look to get the right light tone. 


    AND! I picked a differend color for Morrigan - I chose sheer pink for her. It's goin' to look better next to the blue, and it is the color from the oldest of the character designs, and that is cool with me. I'd rather have a broader pallet of colors, than just purple and black :)
    I am really looking forward to getting startet for real on these cosplays, and especially the wings! 
    about the wig problem, I'm right now trying to decide between these two:
    • the green one for 19.29 $ incl. shipping
    • the blue one for 19.99 $ incl. shipping
    The green seems to be of better quality, but if I'm going to stick with the design above it has to be more blue-ish... I think I'm going to look for a third choice - maybe I can find a color in-between these two.  


      10.24.2011

      "I am your FATHER"


      Darth Vader ear rings


      My friend invited me to this John Williams concert in TIVOLI , Copenhagen. I was all exited about this! the symphony orchestra would play music from some of my favorite movies and it was goin' to be AWESOME!!!


      ! The awesome concert poster :D !

      I immediately thought of what I was gonna wear and how I could nerd it up because I can't help myself being a fan girl for harry potter and star wars X) SO! I went for the black, Darth Vader groupie look, and I needed some jewelry to go with my fandom.


      I decided on trying out a material that I haven't worked with since freaking elementary school. I don't know the english word for it, so I'm gonna hit you with a lovely direct translation: shrink plastic!?

      It's this thin plastic sheet you kan draw on, put it in the oven for 4 min. to make it shrink and harden to achieve an acryllic look.


      these are the materials I planned to use

      but I only used these:
      • shrinking plastic, see-through.
      • pencil + eraser.
      • permanent marker, black.
      • pigment liner 0.5
      • scissors.
      • darth vader print

      the see through shrinking plastic has one shiny side and one rough. You draw on the rough side.
      I used a pigment liner which isn't ideal for this work, 'cause it kinda blurred out and the edges didn't get as sharp as I wanted them.
      Because of that I actually only made one of the earings with this technique, for the other, I just went straight for the permanent marker - this required a steady hand, as the tiny lines was like a third of the thickness of the markers tip.


      The result when filled out looks like this! pretty neat IMO!


      I made a pair and cut them out like this. I also needed holes in the Vader masks to make them able to dangle from my pretty ears, and I made them with a regular hole-puncher you would use for making holes in paper. I made the hole right at the top of the helmet.


      Here comes the hard part! The baking of the shrinking plastic! dun-dun-duuuuun....
      The basic guideline is to heat the oven to about 130 ̊ celcius (260 ̊ F) put in your shrinking plastic - colored side up - for 3-4 min.

      BUT!! I just want to ad some pointers to that:
      • make sure you are placing your items on a clean surface (in the oven), grease and other stuff will burn into the surface and make it less shiny.
      • keep an eye on your items while they're in the oven - they will curl up a bit, but mos times they will straighten out again
      • when they won't straighten out completely ('cause they won't) you wan't to have a clean surface and a flat clean object to press the items between RIGHT after you take them out of the oven.
      And that's it!!!


      Here they are all done. I connected two metal hoops between the earring and the helmet.


      There were several very cool cosplays at the concert <3

      Derpy me in my outfit with the lovely storm troopers.
      It was an incredible concert with a lot of great moments from E.T., Jurassic Park, Star Wars, Harry Potter and a bunch of other movies, but the greatest thing of all was that they played the imperial march TWICE!!

      Thats all for now ! BYE !