4.06.2014

Bulma

Hello people

I'm back from a looong cosplay and crafting break, since I posted last time.

 I gave birth to my daughter Olivia in August 2013 and I am currently on maternity leave. So I have looots of time for cosplay - NOT! But I was determined that I wanted to attend j-popcon this year, IN cosplay.

I chose Bulma because she's awesome and I love Dragon Ball Z and the manga. This version of Bulma has the amount of elements that I was able to complete in 2½ days, and it is so cute!

Below I will describe some of my material choises and things I consider important, when making a fairly simple cosplay.


I often start my research, by looking through google, for other cosplayers that did the same project. I saw that most of the girls in this outfit, had used a thinner cotton fabric or heavy jersey for the dress/oversize shirt. When I look at the reference pic, I see the pink fabric as being some kind of thick and bulky material, so I went with a soft and thick cotton fabric - the kind 80's jogging clothes where made from.

First two steps:
-checking up on the dos and don'ts by looking through other cosplayers photos.
-notice the materials in your reference photos: is it light and flowy or heavy and bulky, where are the seams?


The shoes are made by painting a cheap pair of canvas/plastic shoes. The flaps are made  from painted denim, with velcro ( It shows in the pic above, right). I used the same paint for the purse because they are similar on the referenc pic.


The socks and scarf are made from stretch jersey. The gun holster is made from leather I got of an old couch before I threw it out (I will make a tutorial for this - it's so easy!) The little purse is made from painted denim - I wanted to get the same color as the shoes, so why not just mix one big batch and paint the whole lot at the same time (I painted the bag after I stitched it)

The shape of the dress/shirt was important for me to get right. I didn't want a tight fitting pink dress, I wanted the oversize shirt look, so that is basically what I made. I did add a little flare at the bottom though.

As I finished the shirt and wanted to test out the bulkyness, with a belt over it, I realized that it was hard to keep the bulks evenly spred out around my waist so I added a thin elastic on the inside witch I zigzagged over, all the way around the waist - and it was perfect!

The "print" on the front and back of her shirt is made from black and white pleather. And it makes the feel of the cosplay very cartoony and crisp! I love it.

This cosplay is very comfortable to wear, especially as I wan't to loose more of the baby weight before doin' the cheeky cosplays I love so much. The little purse was perfect for holding my stuff during the convention.

All photos are snapped at j-popcon 2014 by Sascha

3.31.2013

Blissey Gijinka wig

I found a wig for this cosplay. I decided to go with pink, curley pigtails and bought this one for $ 17.09 incl. shipping on e-bay.


I've decided to wait for the wig to come so I can match the color of the wig with that of the fabric.

3.29.2013

Maternity cosplays

Hi!

As you might have figured out from the headline, I'm pregnant! Me and my fiance are having a baby sometime in the end of august this year. We are very exited! We don't know the sex of the baby yet, but we may be able to figure it out after the next ultra sound on the 4th of april.

With these news, I figured that I have to do some maternity cosplay. The morrigan cosplay is on hold until I get back in shape after I've given birth.

I've done some google research of cosplay to do while pregnant and I've found that there are pregnant characters in some anime and some games. And here is the two I want to make.

Padme Amidala: Revenge of the sith

Blissey: Pokemon

I have to come up with a design for this gijinka version of Blissey. I liked this better than Chansey because Blissey has more features in the design that can translate into frills. I think I'm heading towards some kind of maid look with an apron and pink curley pigtails. looking forward!


10.29.2012

bones, parties and house keeping

I bet I'm not the only student facing the challenge of fitting sparetime in between studying, work, house keeping and sleep. at the moment I'm attending a biological anthropology course, where we get to handle real human skeletons. It is really exiting and I don't fear the final test before Christmas as I normally do. The other course I'm attending this semester is latin. It's not that hard, but there is a lot of studying to do and I don't look forward to the exam.
I made an improvised beer maiden costume for our october fest and next thing is halloween at thursday. I think I'll do a scary doll thing .
The house needs cleaning and it is really not working for me to do it in stages... I have to clean everything in one go. Now my mission is to find a smart way of getting it alle done and I'm sure I can find some good advice on this interneret! I will update on this issue next week - it really can't wait much longer!


it's me on the far right :)

7.12.2012

Brigadine DONE

Some time ago now I finished the brigadine for my fiance who does live role play once a month. It looks awesome! I'll show you the first sketches (that's always fun), some action photos and some WIP shots.

Brigadine:

The basic concept is a leather vest lined with metal squares, fabric and padding. I chose a geometric pattern for the front and back just based on what I thought would look authentic. After all -  it is made from leather of a black couch, so it wouldn't work with a plain vest because the leather is too thin to give it the right look of a hardened leather surface.

I made this with two buckles under the left arm and one on the left shoulder with a prolonged sidepiece so it can be fitted to summer or winter use.


Maid dresses and Morrigan

At the moment I'm really busy sowing dresses for the maid café at Genki con 2012. I need to make 14 dresses - 7 of each design. The actual maid dresses is for the day time café and the kitsune dress is for the night café. Tea designed the dresses - she is very talented and just got in the final selection of new students of the Danish Design academy.


It is a lot of hard work, but some of the maids are helping me cutting, sowing and ironing where they can. Tea also helping and is going to work at the maid café in her own design as well! so cute!

I'm still working on the Morrigan cosplay, but the process is slow - I'm working all the time and when I'm not, I'm at Kraftwerket where we have an entire room to ourselves (not that big) with a high table for cutting fabric and room for 3 sowing machines. 


I would like to finish the Morrigan AND Lilith cosplays for Genki con, but with these 14 dresses and A LOT of working in the toy shop, I'm not sure if I can finish in time.... SUCKS!

I will work as hard and fast as I can without compromising the dresses and then get on with Morrigan  and Lilith. 


5.31.2012

Exams

So I'm almost done with the exams for this year.

As every year I never really got the blog flowing, but I really really want to do a better job for the rest of the year.

As you might know, if you're studying hard every spring, you find a billion things you'd rather do! And I've got plenty for this holiday. Here's my list of top three things I need to do first:

  1. Update deviant art!
  2. Update blogs
  3. Finishing Morrigan cosplay
I better get back to studying for my exams.... I'm am really looking forward to getting this under control!

3.19.2012

I'm Back!

I broke the power supply for my computer ages ago, and I've now got a new one! finally!

I'm proceeding with the Morrigan cosplay, and will post a progress report next week along with lovely pictures and convention plan for my summer!


1.16.2012

Update on current projects

It is definitely time for an update now!
  • Christmas stuff
  • Morrigan cosplay
  • role playing armored vest
Christmas stuff
I didn't get to make any Christmas decorations this year because I was so busy at work (the toy shop), but I did make a gift for my mom!

I made her this sequenced card holder/wallet that she wished for. It is small, but took me a while to make, but she always gets happy when I make her stuff, so it was a thrill to see her unwrap it Christmas eve.


This is teh type of wallet my mom wished for. It holds credit card sized stuff.

This is the final result! I'm so happy with it

The best gift all Christmas eve was the one my sister and I gave our mom together. We went to a photographer and got a bunch of photos taken of the two of us together, but also separately. They turned out really nice, and made a great gift for my dad, mom and uncle - I guess my grandma also gets some, but she boycotted Christmas some years ago, so she wasn't at Christmas eve. she's a bit loony in that way.

Anywho, here are some of the photos we got from the shoot.


The photographer is really talented and has a shop of his own. He is one of my moms old friends, and I will be using him for some future photoshoots of cosplay.

Morrigan cosplay
I had loads of time off to myself after Christmas and new years passed, so I got a really great start on this cosplay. I will make a separate post about the progress and the steps on the way (with lots of photos) soon. But at the moment I have the top allmost done and the base of the wings are ready to be covered in fabric.
the top, unfolded.

The wings needs to be covered in fabric.
Theres no better feeling than just sowing away and seeing it all come together like this and so fast! I love it!
Armored vest
I'm making this for my fiancé. Him and his friends roleplay in the woods once a mont, and he needs some new gear. I'm making him this armoured vest which he helped design himself.
This is the front piece, made from leather we pulled of an old couch.
The numbers help me with seeing which piece goes where. 
This goes inside the leather vest. It's made from linen viscose which I padded in 2 layers.
Inside each square are metal plates. 


The stuff from this post will eventually all have a separate step-by-step walk through.

11.20.2011

Phone Decoration!

I recently bought a new smart phone. I went for the Sony Ericsson xperia Arc (gold) o_0. Anyways, it is very fancy and I love Ericssons phones. My last phone where a Xperia mini (which wasn't actually that good). Aaaaaanyways!

This is me and my phone before the makeover
I wanted to decorate my phone in a decoden inspired way. This is some of the inspiration I found.

pic from ping mag. one of my favorites! <3
Go to link, to see more decoden phones. They have a lot of different styles :)


business card holder by angel-kitty


pic from this very girly glitter  blog


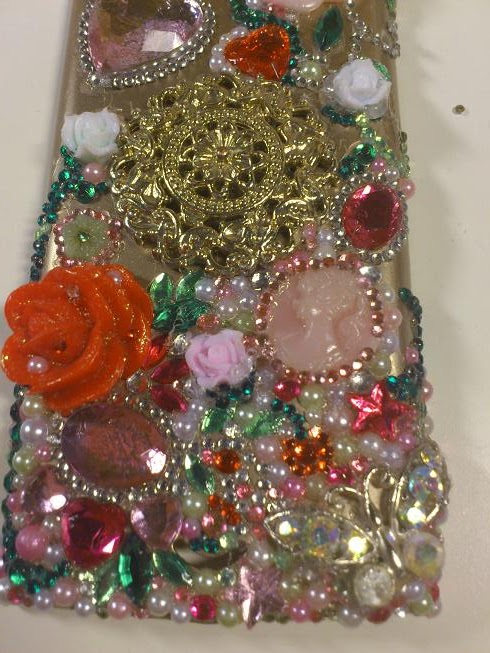
At first I was going for a theme like: My little pony, Hello kitty, or something like that since I have a bunch of decorating stuff like that from old jewelry and such. I also have a lot of nail decorating stones, pearls and gems (only plastic ones though ^^), which I wanted to fill in the spaces between the bigger stuff. I collected these things, and thought they went pretty well together color wise.


I tryed out different positions of the items, and then glued them on when I had decided. From there, it's just being creative with the filler gems!


I started out by adding the biggest decoration pieces, to get an overall look of the outlay.
-pink rose and cameo is from a Lisbeth Dahl bracelet
-red rose broke of a ring.
-big hearts and gems: some are stickers and some are flat back rhinestone leftovers.
-big gold ornament from a ring I bought at H&M.
-small gell roses from nail decoration kit bought on e-bay.
-all smaller rhinestones and flat back pearls allso from nail decoration purchase from e-bay.
-butterfly is from a belly button piercing.

I mostly used regular universal glue.
I used Dana lim, which is definitely not the best glue for this, but it's cheap and easy to acquire (in Denmark).
For the odd shaped pieces I filled in the bigger spaces between the piece and the phone cover, with my glue gun,
and then glued the contacting surfaces with the universal glue.

And then I just kept on filling up the spaces with different sized rhinestones and flat back pearls.
I also added some gems to the roses for extra bling!


This is the final result!
I love every bit of it, and it makes me very happy to look at it every day ^^ 

It took me about 4 straight hours to put this together, and it hurt my neck a lot. But I'm so happy with my awesome phone now.! The best thing is that it doesn't have the same over the top childish cuteness as the ones I found for inspiration.

Buying stuff for decoration:
I allways use ebay to buy decoration stuff like this, because it is ridiculously chap! So here are some sellers I've used and am very happy with. My experience is that the shipping takes about 2 weeks from China.

peikuan123 Has a lot of deco stuff for nail, and scrap booking, like rhinestones and cute resin shapes like cakes.

timtimng Loads of cheap rhinestones.


11.10.2011

Shiva cosplay, step by step

This is gonna be a long one ^^'


I'm describing the process of making my Shiva cosplay, trying to describe what and how I made the different components.


    seams of the body suit


    Bodysuit: I had never made a body suit before, so I just did what came easiest to me: making a shirt and a pair of leggings - then sow them together :D - I made the leggings so they only have a seam on the inside of the legs (as shown on drawing 1). I fitted it while wearing it inside out. I left the shoulder seam open because my zipper skilz weren't that good that I trusted myself with sowing a zipper intro lycra that was supposed to be stretched when worn. I basically chose that I would rather sow myself into the suit X)

    "sky blue" body makeup
    I used this for my face and hands
    "royal blue" body makeup
    I used this for my feet :)
    The bodysuit got painted at the bottom of  the legs with the body paint I was using for my feet, this has a really nice effect and the transition from skin to suit became almost invisible unless you knew it was there. The patterns on the side of the thighs is painted with purple and silver acryllic paint while wearing the suit.

    The beaded chest pieces are made separately. I used a scrap of blue linen fabric I had lying around, placed it at my boob, pinned it so i got "the right shape", and then i sewed the incisions, then I placed it on my chest again and drew the shape i wanted. After cutting away what I didn't need, I was left with the base for the chest piece which I completely covered in beads and sequence. I made the icy side in a star shape. The sequence and pearls for this side where in a silver/grey/white/light blue theme. The other side I made more regular and cup shaped mostly in darker blue colors and then I made the snowflake pattern in white sequence with no glitter to make it stand out properly. When the beading was done, I jumped in the suit and placed them where they where supposed to be, and then hand stitched them on. (close up coming soon)

    (not me!)
    the point is to show the really
    cheap quality of the wig 
    The wig is made from 3 wigs of this type (pic.).One to use as a wig, and the others I wanted to use as separate hairpieces after cutting them up. Because of lack of time I didn't trust e-bay to be quick enough with the shipping of a wig, so I had to do my best with what I had. I unpacked them and colored them by hand In a big pot on the stove ^^. I used Dylon hand color for textiles. I made sure that it was able to color nylon and other artificial materials, so I was going to get the right color. I predicted that the color wouldn't become to dark because of the light base, so I chose a darker blue than I was aiming for, and it turned out perfect. After dying the wigs, I hung them to dry. While they dried up I sew bases for the dreadlocks. I sowed these dreadlocks in different lengths and of different thicknesses. I made them from blue cheap velvet (direct translate from danish: nervous velvet?), and filled them with batting. I made about 12. 

    batted dreadlock with ring

    The rings in the end of the tentacles are made from aluminum foil which I shaped into rings of different size, and then covered it in paper clay. The foil core makes it really light weight. I painted the rings with silver acrylic paint. I left one end of the dread lock open so I could sow them on the wig,  the other end, I folded around a ring and sewed it (see pic.). I left 2 tentacles with out rings. I picked one wig to be the one I was wearing


    wig being cut :P

    I started cutting 2 of the wigs into smaller hairpieces. I cut'd the amount of hair I wanted, sewed several times back and forth and then glued it together with my glue gun (see pic.).

    Now I'm left with  a lot of extensions, 1 wig (still with hair) an 12 dread locks.

     I wore the wig while attaching the open ends of the dreadlocks to the wig base with needles while making sure the hair on the wig didn't got stuck underneath. I wanted the right shape of the hair, and I haven't seen a shiva cosplay where it looked properly done and shaped. After all the dreads where attached with needles I sew what was possible on the machine, and hand sew the rest of it. 

    (my mad paint skillz)
    It is a wig with one dread sown on and
    wrapped in hair.
    Now the dreadlocks needed to be wrapped with hair and the brown linen (which was also a leftover from an  old Pocahontas costume :P ). I did it like I've tried to illustrate with my mad paint skillz since I didn't take any photos during the producing of this -_-' . I wrapped the hair still attached to the wig around the dreadlocks so almost none of the fabric underneath was showing, when I ran out of hair i used one of the extensions I made. Tucked it underneath the hair that was already wrapped and sealed it with some brown linen which I just wrapped around and tied in a knot. I did the same above the rings to make sure the hair stayed in place. 

    To keep this 11 kg (24 lbs) wig on my head I sewed on a silver sequenced elastic hair band just above the bangs of the wig. And the wig is done!

    The silver panties, are made from polyester, and blue elastic bands. They are placed so they cover up the connecting seam between the pans and the shirt of the body suit.

    The flowing hip shale is made from yellow chiffon which I dip dyed to make the bottom blue. The rings in the bottom of it is made from paper clay that I panted gold with acrylic paint. the Wrist gloves I made from a red/purple, 2 colored satin. It's basically a triangle with a hole for the finger, attached to a cuff. I closed it with velcro. I sowed on some gold rope with gems I made from fimo as well. 

    Go to my cosplay site for more photos of the finished cosplay.